Building a Pretty Incredible Budget Gaming PC Out of a 2013 Dell Optiplex 9020, a GTX 1650, and Various Adapters
First off, let me warn you, the reader, before you get too far into this post: NERD ALERT! We are going to do a deep dive into purchasing a circa-2013 Dell Optiplex 9020 business-class mini tower PC, with the ultimate goal of turning it into a VERY respectable gaming PC.
Before we get started, we need to answer the question, WHY? Why would we want to do this? The answer to that question is: for very little money, you can purchase a complete PC that, with a few upgrades, can be transformed into a highly functioning gaming rig with the capability of playing nearly any game being sold today. More and more family and friends have been asking me to build them gaming PCs. A recent request from a friend was, "What's the least amount of money we will need to spend and still be able to game?" That was the impetus for this project.
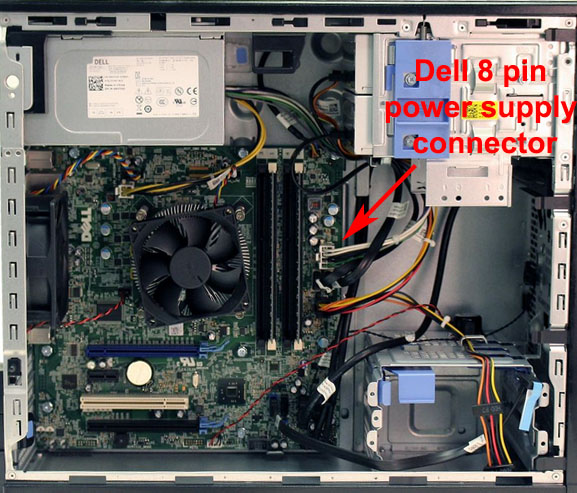
The Dell Optiplex 9020 comes with an i5, or i7 processor, 8 or 16 GB of RAM, and a 290 watt power supply in a mini tower case. It can support up to 32 gigs of DDR3 RAM at 1600 mhz, and is able to integrate and power many video cards such as a GTX 1050, GTX 1060, Radeon RX 470, and GTX 1650. Additionally, with a simple power supply upgrade, even more capable video cards can be installed. If you decide to go with a higher-end video card, you'll need this adapter to convert an ATX power supply 24 pin connector to the Dell 8 pin:
https://www.amazon.com/gp/product/B07XRKT7SH/ref=ppx_yo_dt_b_asin_title_o06_s00?ie=UTF8&psc=1
Image of the inside of a Dell Optiplex 9020 computer:
If you want to get the most out of the installed video card, anything more powerful than a GTX 1650 may also need an i7 4 core/8 thread processor as in some games, the CPU might be running at 100%, bottlenecking the system and resulting in choppy, stuttering gameplay.
Where should you look for a system? I scoured the internet checking out deals for a Dell Optiplex 9020. They can be found for sale on many different websites such as eBay, Craigslist, Amazon, etc. I finally decided on a decent system from Amazon.com. Some of the benefits of buying from Amazon Renewed are the computer comes with a 90 day warranty, and it ships with a new, albeit very janky, keyboard and mouse. One drawback of purchasing from Amazon is that the systems are a bit more expensive than a system purchased from eBay.
The 9020 I bought from Amazon cost $177 and included free shipping. It came with Windows 10 Home (which I promptly reset and reinstalled), an i5 4690 processor, 8 GB of RAM, and a 500 GB hard drive. A similar spec system on eBay right now with Windows 10 Pro is only $149.00 with free shipping:
The first thing I noticed when opening up the case was the lack of a PCIe power connector on any cable coming out of the 290 watt power supply. How then can we power a video card that requires additional power from the power supply? Easy. Just disconnect the SATA power from the DVD drive, connect both ends of this adapter to the two SATA power connectors on that cable, and then connect the 6 pin on the other end to the video card:
https://www.amazon.com/gp/product/B01DV1Z5S6/ref=ppx_yo_dt_b_asin_title_o03_s00?ie=UTF8&psc=1
It works flawlessly and I have zero need for the DVD drive. Your other option is to purchase a new power supply.
I ended up installing a Gigabyte 1650 Windforce OC* video card in my Optiplex and was shocked to see that with only that one upgrade, many hours of gaming fun was had. Total cost for the gaming PC at this point- $384.49, less than a new console, and significantly more powerful. Power draw at the wall was under 200 watts, well beneath the rating of the 290 watt power supply, and the system was, and still is, rock solid with absolutely no issues.
*I purchased this video card in early January, prior to the explosion in prices of video cards due to the latest crypto-mining craze.
Since that point in time, in an effort to see just how much performance I could eke out of this system, I added some additional upgrades. Using the now unused DVD drive's SATA data cable, I installed a Samsung EVO SSD beneath the hard drive, and powered it with the second SATA power connector on the hard drive power cable. I terminated the other end of the SSD's SATA data cable into the motherboard in the SATA port right next to the port being used by the hard drive. Using Samsung's Data Migration software, I cloned the Windows 10 installation on the hard drive over to the SSD. You can find that software here:
https://www.samsung.com/semiconductor/minisite/ssd/download/tools/
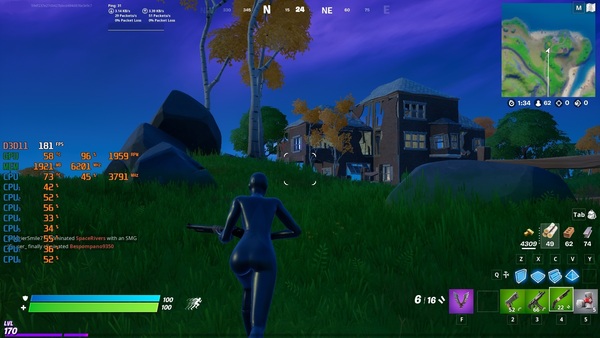
Next, I purchased and installed (2) 4 GB 1600 mhz DDR3 sticks of RAM, and upgraded the Core i5 4690 to a Core i7 4790. The difference was pretty amazing. I was able to change game settings from low-medium in most games with framerate locked to 144, to medium-high and a framerate set to my monitor's maximum of 165. I then turned off the framerate limiter and found Fortnite rendering above 180 FPS at medium-high settings.
Image of Fortnite gameplay rendering 181 FPS:
Right now as I type this, my daughter is playing Valorant and Fortnite, and is oblivious to the fact that she is having all of the fun that she is having on a computer originally built and sold in 2013. I have put additional information into a Google Doc for those of you that are interested. It is here:
https://docs.google.com/document/d/1pCEf7XoRrvTdrUdiqUlolv-9g_uf65CUrTeHvbMZUaI/edit
After all of the additional upgrades, the computer still comes in at less than $450. As of this moment, the most inexpensive gaming PC at Best Buy is $849.00 and comes with an nVidia GT 710 video card. The video card in our Optiplex build is literally 1000% better than the one in the Best Buy system.
Feel free to hit me up on Twitter if you have any questions about this project or a similar one.
Benchmarks:
Cinebench R15
Graphics- 110.17
CPU- 765
Time Spy
Overall- 3727
Graphics- 3691
CPU- 3952
CH
 Chris Hamady
Hamady Holiday Lights in Sylvania for the Seagate Food Bank GoFundMe Campaign
Each year, the Hamady family welcomes cars filled with spectators to our holiday light show. We try to bring joy to others with this experience, and in turn, bring joy to ourselves. This year, in an effort to help those in need during this Covid-19 crisis, we are aligning the light show with one of the most impactful nonprofits in the Toledo area, the Seagate Food Bank. We are committed to raising money so that those less fortunate than us can achieve food security and feed their families.
If your family is able to assist with this task, please consider making a donation to the Seagate Food Bank. Any amount that you can donate will help feed struggling families in NW Ohio. The link to the GoFundMe campaign is here:
https://charity.gofundme.com/o/en/campaign/sylvania-holiday-lights-for-seagate-food-bank
If you would like to watch the approximately 15000 lights synchronized to music broadcast on 87.9 FM, they are viewable from Timberstone Junior High School at:
9000 Sylvania Ave. Sylvania, OH 43560
From our family to yours, we hope that you all have a safe, wonderful, and blessed holiday season. Thank you.
The Hamady Family
Overclocking AMD Ryzen Hardware to Boost Performance in Gaming and eSports
What seems like not so long ago, back in January of 2005, I was experimenting with overclocking my Quicksilver PowerMac G4 in order to achieve better performance with DigiDesign's Pro Tools digital audio recording/editing software, and ID Software's Quake 3 Arena. Long story short, things did not initially go very well, and I quickly realized how difficult overclocking can be. You can read that old blog post below if you are feeling nostalgic. WARNING, my son would describe my writing in that old post as a bit "cringey." Having read that post myself after 14 years have passed, I might have to agree. :)
http://web.archive.org/web/20110929104627/http://homepage.mac.com/chamady/DP133Review/
Fast forward to today, and I am once again smitten with the notion of eeking out every bit of performance from gaming/eSports systems. eSports is exploding across the world, and even K12 schools, colleges, and universities are now participating in this new spectator event. It's no secret that a superior gaming PC can potentially give an eSports competitor an advantage over someone else gaming on a computer with less capability. What can be done to increase the performance of a modern gaming PC short of buying better hardware? Overclocking. If you want to jump right into overclocking without reading about my experiences, feel free to head over to overclockers.com and check out this excellent article on the subject:
https://www.overclockers.com/amd-ryzen-overclocking-guide/amp/
The machine that I experimented with is a CyberPowerPC Gamer Master ET8832. Currently, you can see the full specs on the CyberPowerPC site here: https://www.cyberpowerpc.com/system/READY-TO-SHIP-GAMER-MASTER-ET8832
The most important specs that we will be working with are:
Processor- AMD Ryzen 7 2700X 8 core/16 thread
RAM- 16 GB XPG DDR4 at 2666 MHz
Video Card- MSI Ventus GeForce® RTX 2070 8GB GDDR6
Fans- Three case fans, one processor fan, and two fans on the RTX 2070.
There are a number of pieces of software that can assist with this process. They are:
Cinebench
CPU-Z
GPU-Z
Ryzen Master
Let's first start with the processor. In stark contrast to Intel's past attempts to stop overclocking (see: https://gadgets.ndtv.com/laptops/news/intel-officially-kills-overclocking-of-locked-cpus-with-microcode-update-800575 ), AMD makes overclocking EXTREMELY easy. Simply download the Ryzen Master software from https://www.amd.com/en/technologies/ryzen-master and create some overclocking profiles. Here is a good video detailing how to do just that:
https://www.youtube.com/watch?v=Nyj6qa-jtfk
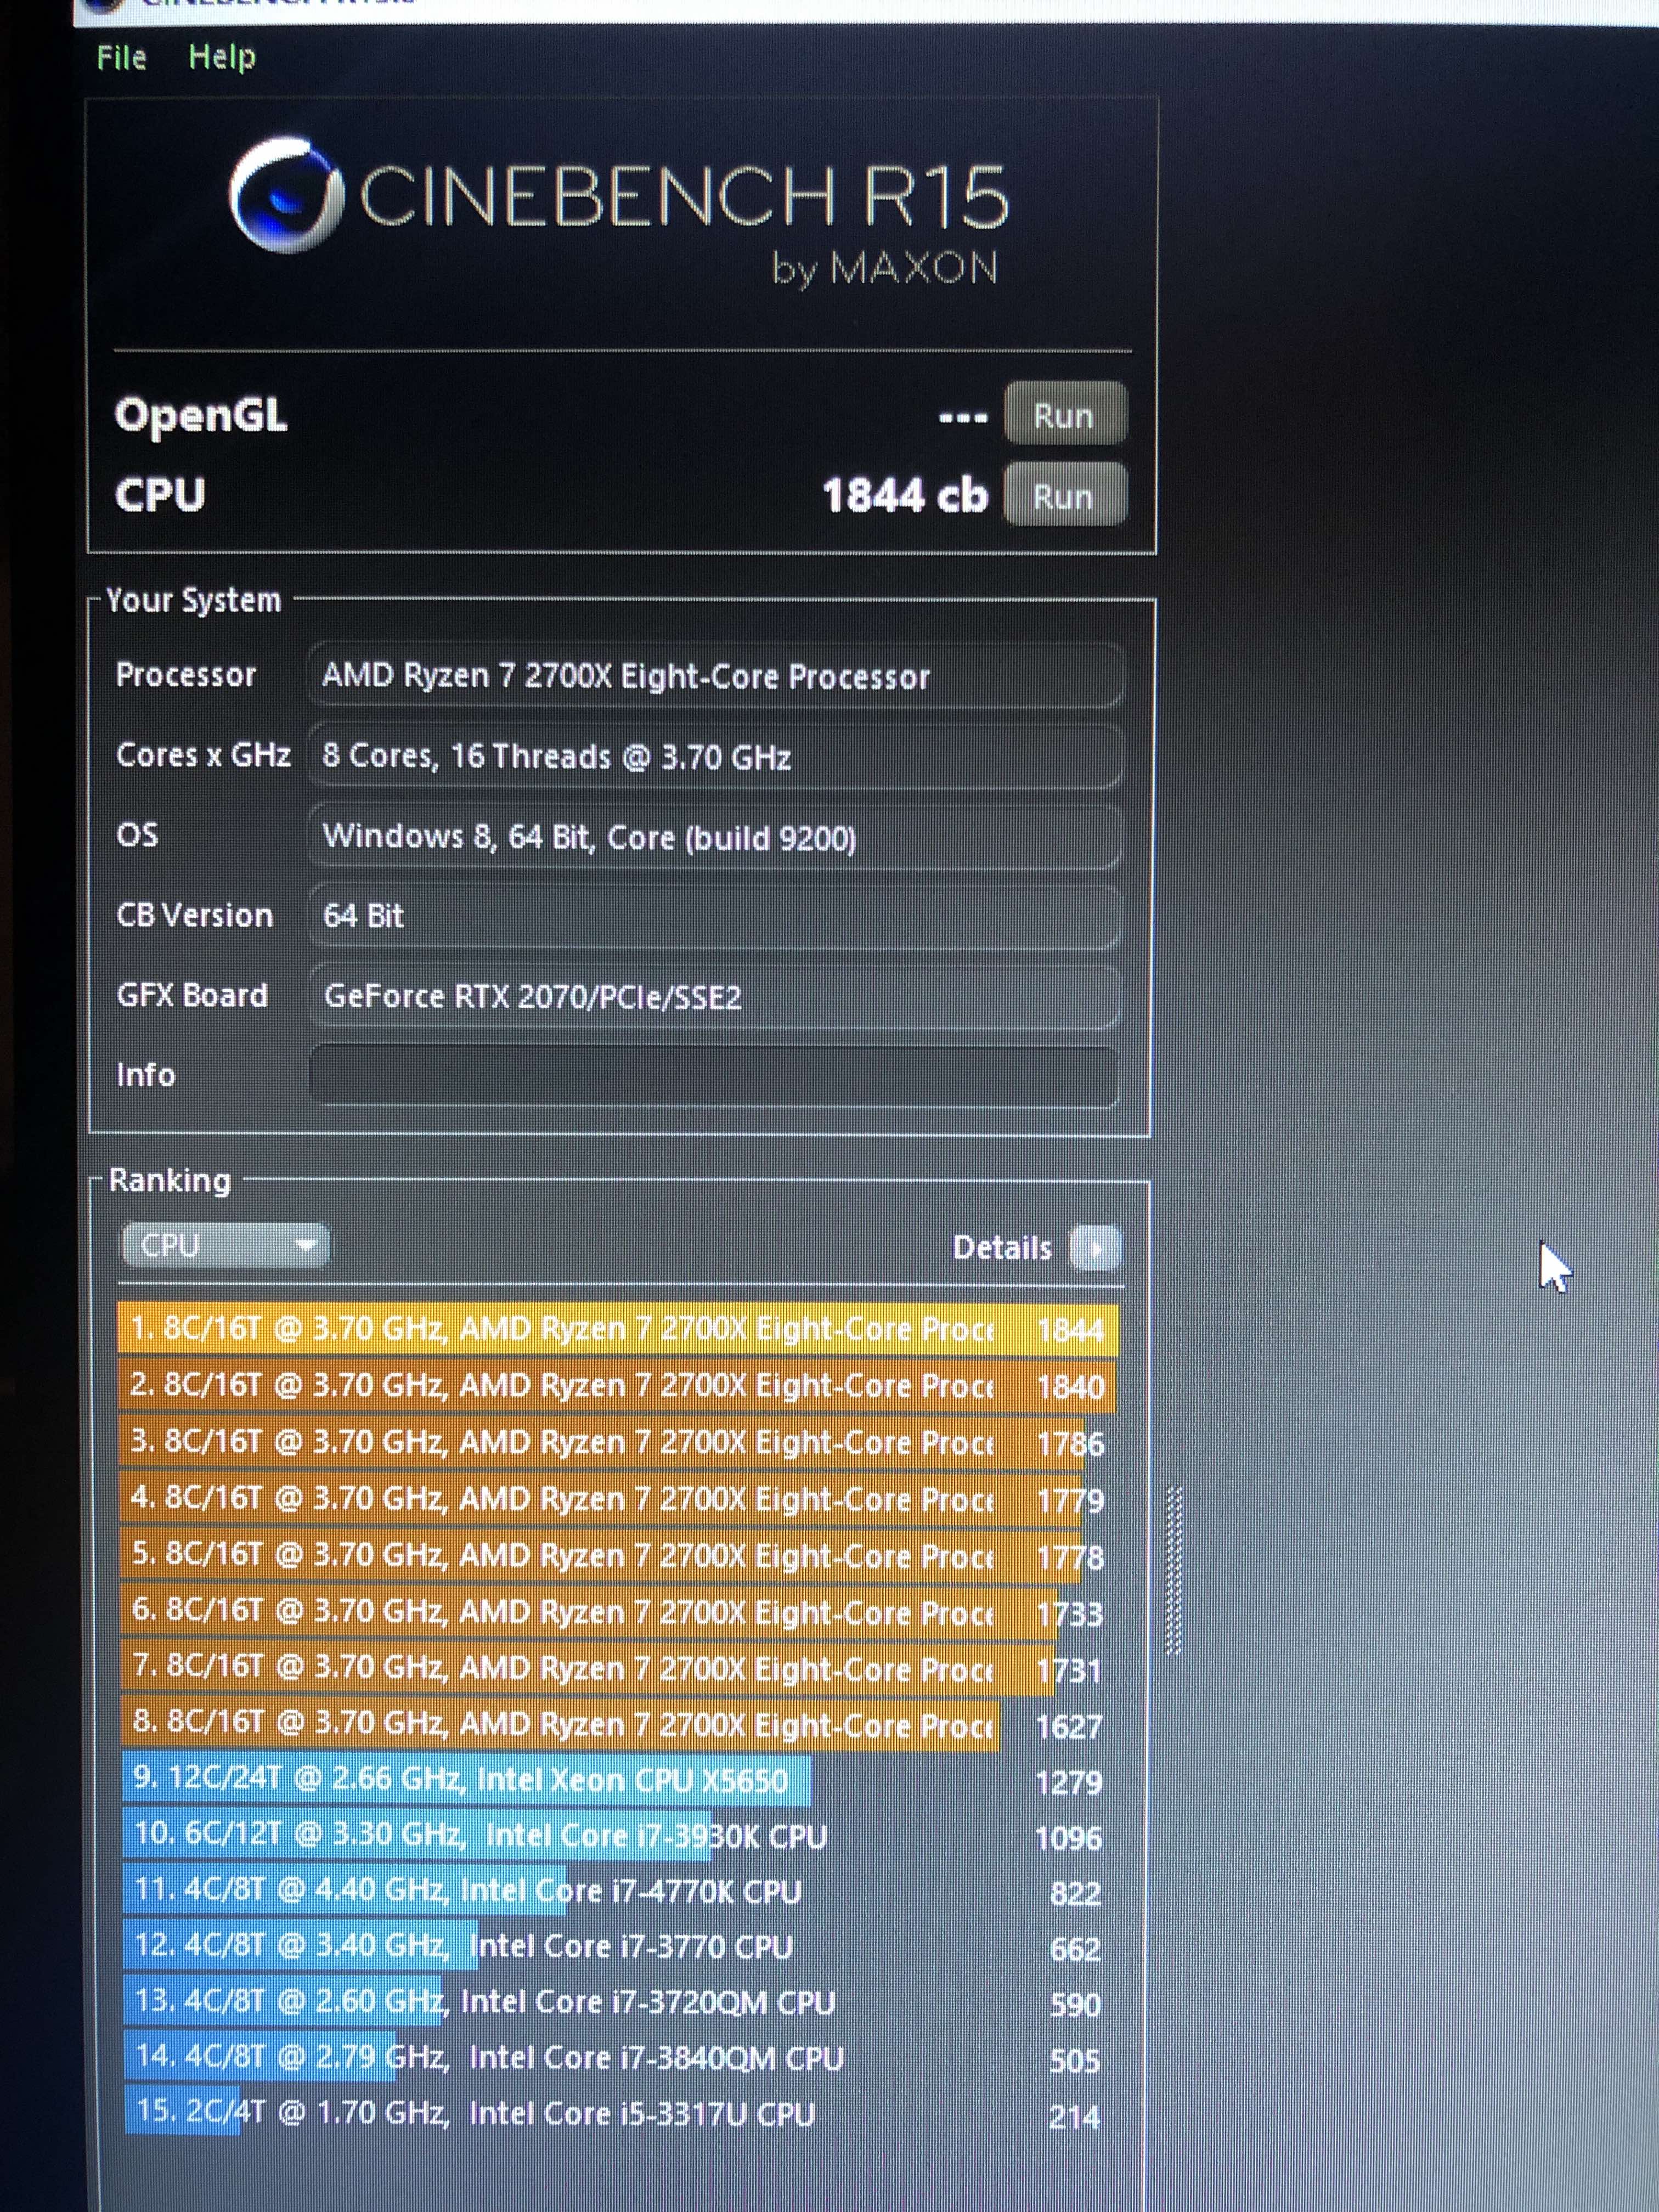
You will want to gradually increase the core clock speed of your processor until you begin to experience issues such as applications, or the entire computer, crashing. Once that happens, you might see if gradually increasing the processor's core voltage can stabilize your overclock. Using Ryzen Master, I was ultimately able to set the Ryzen 7 2700X's all-core clock speed to 4.1 GHz rather than the default 3.7 GHz after settling on a voltage increase to 1.4v. Raising a Ryzen 7 2700X's core voltage any higher than 1.4v can be risky and could potentially reduce the life of your processor. Using these settings, the Cinebench CPU test scored its highest and the system was very stable for gaming and general purpose computing. In the image below, you can see how the Cinebench CPU score gradually improved during eight unique overlock configurations and subsequent Cinebench tests. Note: Cinebench reports the CPU at its default speed, regardless of the actual overclocked frequency.
In order to determine stability, once changes were made to the processor core clock and/or core voltage, I ran the computer through both the CPU and OpenGL Cinebench tests. I then gamed on the system playing Fortnite and Apex Legends for at least 30 minutes without a crash.
It should be noted, however, that once a stable overclock profile was determined for the processor, and the overclock was rock solid during: gaming, Cinebench testing, basic computing tasks such as web browsing or watching online videos, doing any extremely hardcore task such as transcoding video using Handbrake maxed out all of the CPU cores at 4.1 GHz simultaneously and continuously. This in turn resulted in extremely high CPU temperatures and ultimately caused a system crash. I believe that I would have to replace the stock CPU cooler with something more specifically designed for overclocking if I wanted to transcode video in Handbrake with a CPU overclock.
Next, I worked on boosting memory (RAM) speeds. Let's say that you want to upgrade your 16 GB of 2666 MHz DDR4 memory with additional RAM, but you can't seem to locate any 2666 MHz RAM to purchase. It is oftentimes possible to purchase faster memory such as 3000 MHz DDR4, install it, and it will step-down in speed, running at a slower clock rate.
That is exactly what I had to do in this experiment. The original 16 GB of RAM was running at 2666 MHz. I installed 16 GB of 3000 MHz RAM into the CyberPower PC to take it to 32 GB and the faster RAM ran flawlessly at 2666 MHz. Next, I overclocked the default RAM settings using the BIOS so that ALL of the memory would run at 3000 MHz. Here is a video that discusses how to overclock RAM (among other things) on a Gigabyte motherboard:
https://www.youtube.com/watch?v=X8z_wTStcf8
and another here:
https://www.youtube.com/watch?v=zoXbHRR7j98
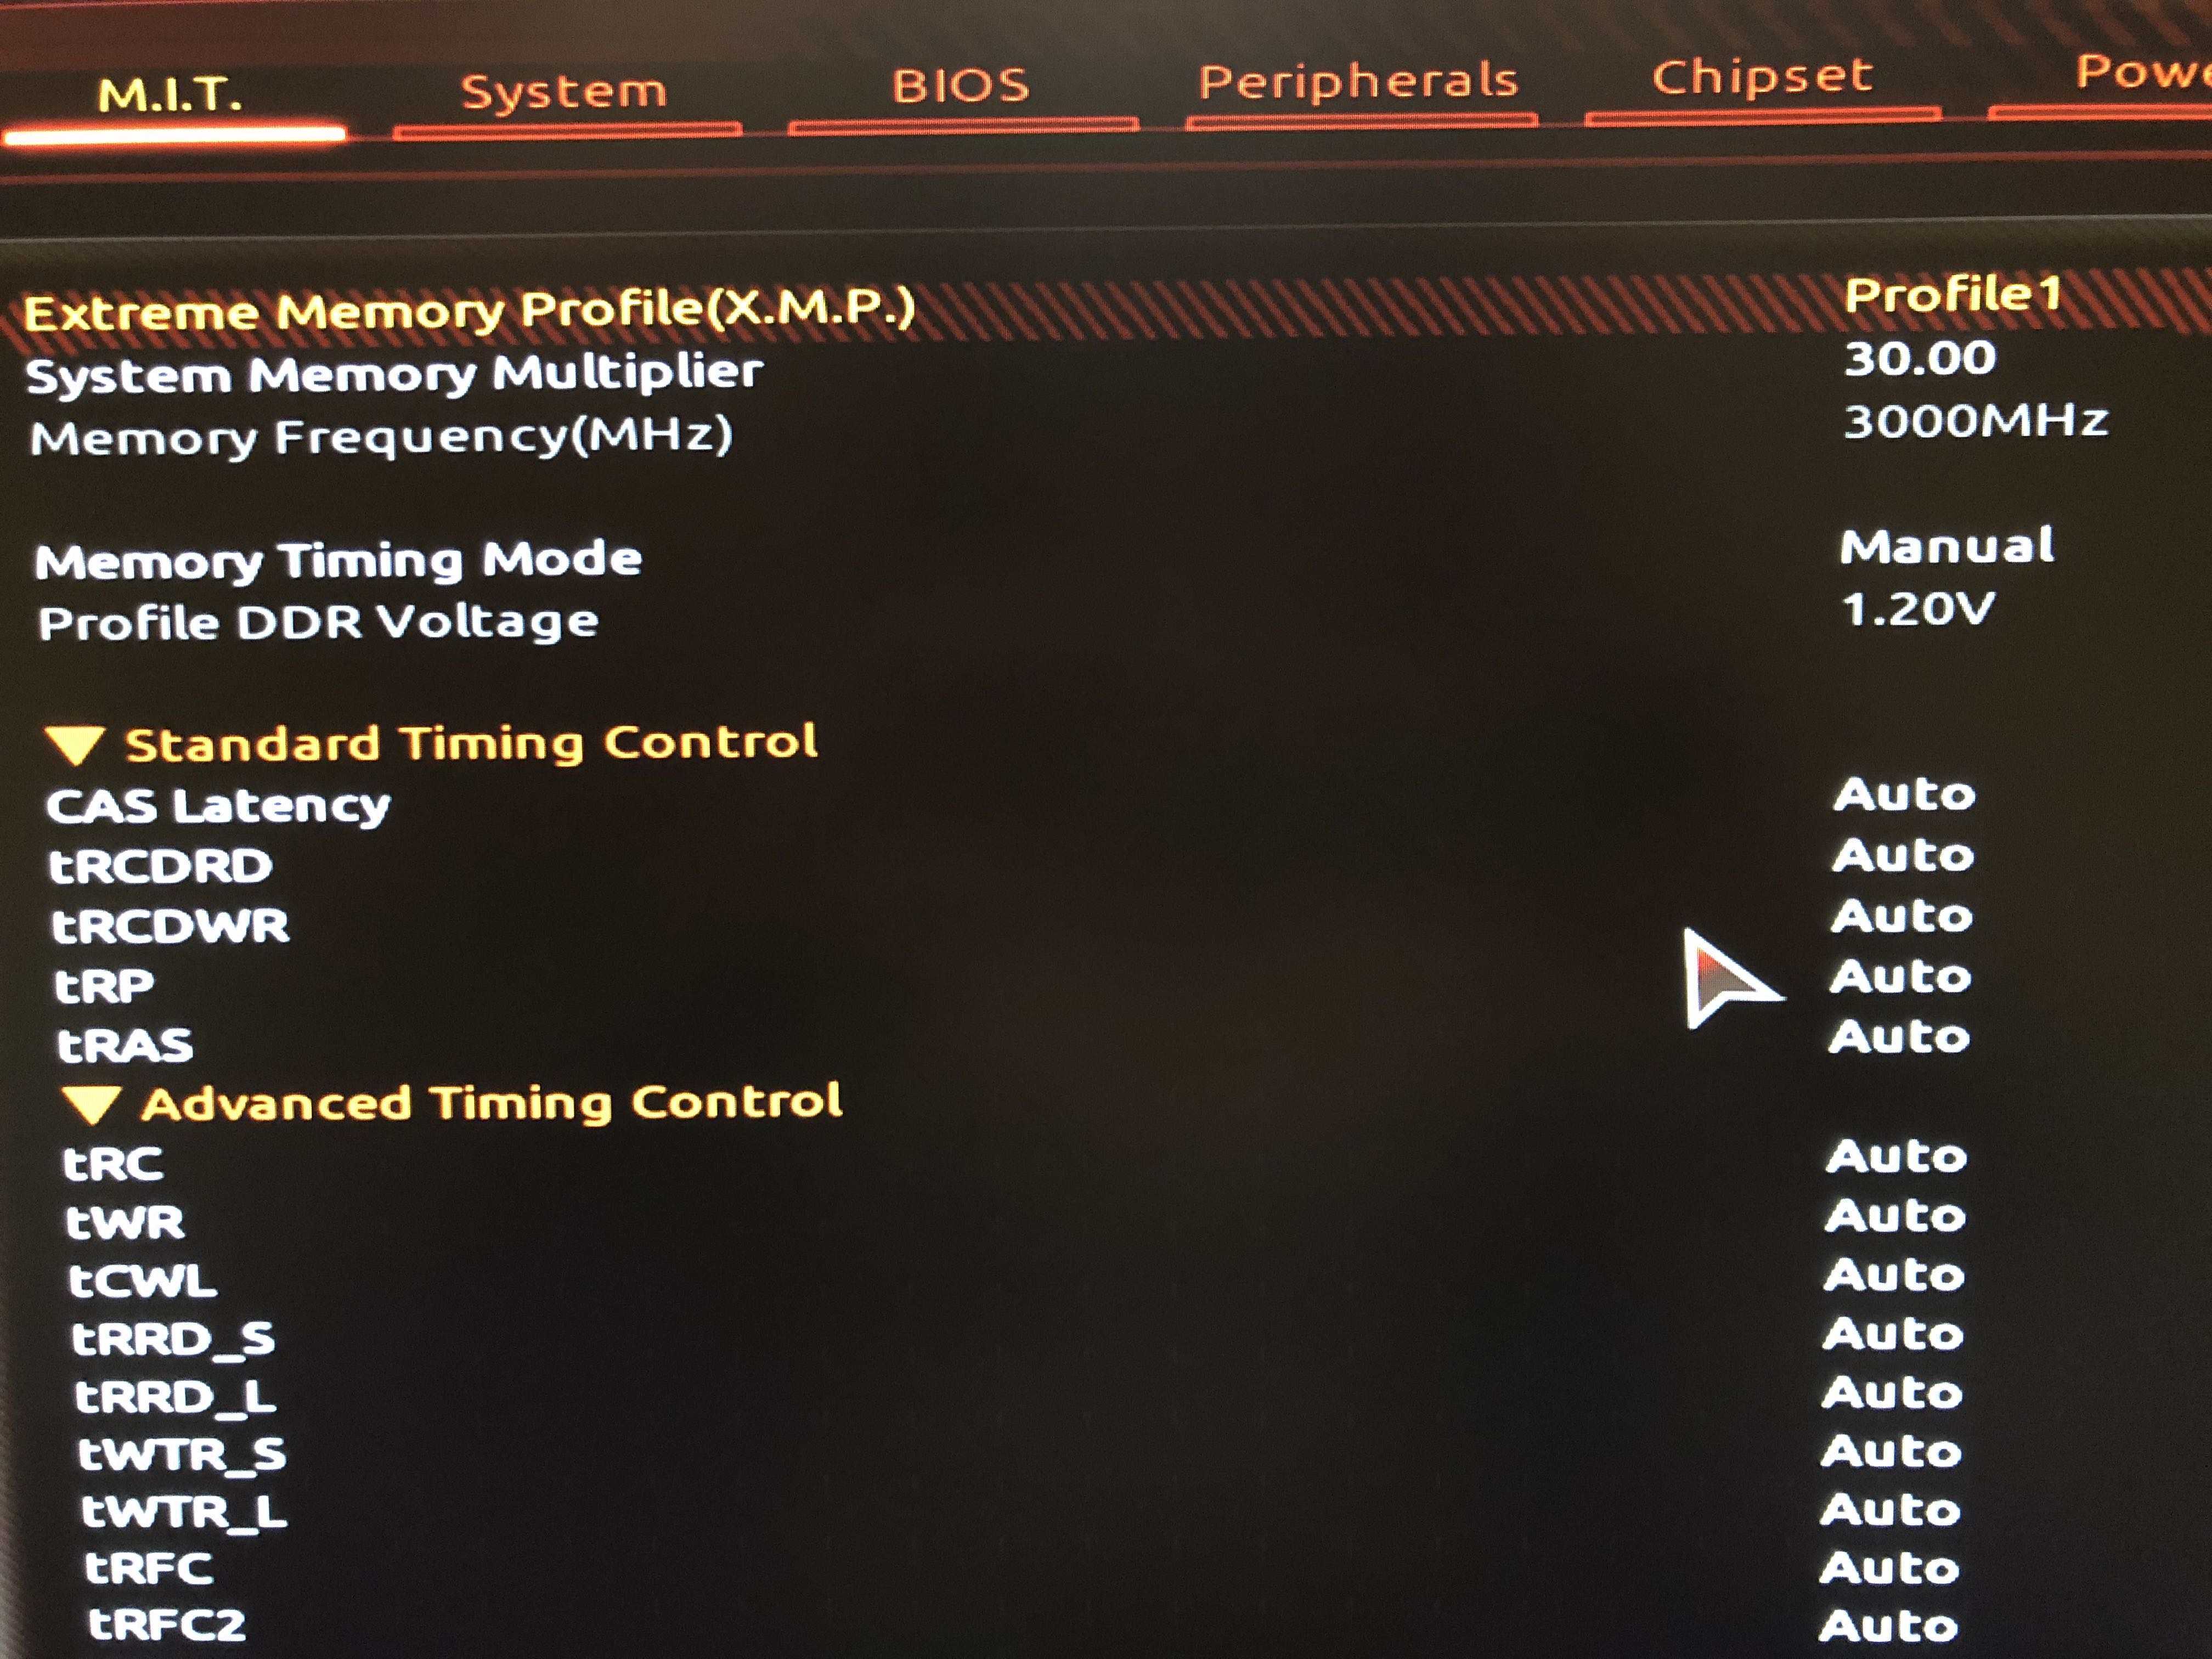
The memory in the CyberPowerPC is now all running at 3000 MHz via an X.M.P configuration, which is one of the simplest ways to enable a memory overclock. You can see the bios setting here:
Finally, we can overclock the PC's MSI Ventus RTX 2070 graphics card to get even more frames per second out of it when gaming. In order to do this, I downloaded and installed MSI Afterburner from:
https://www.msi.com/page/afterburner
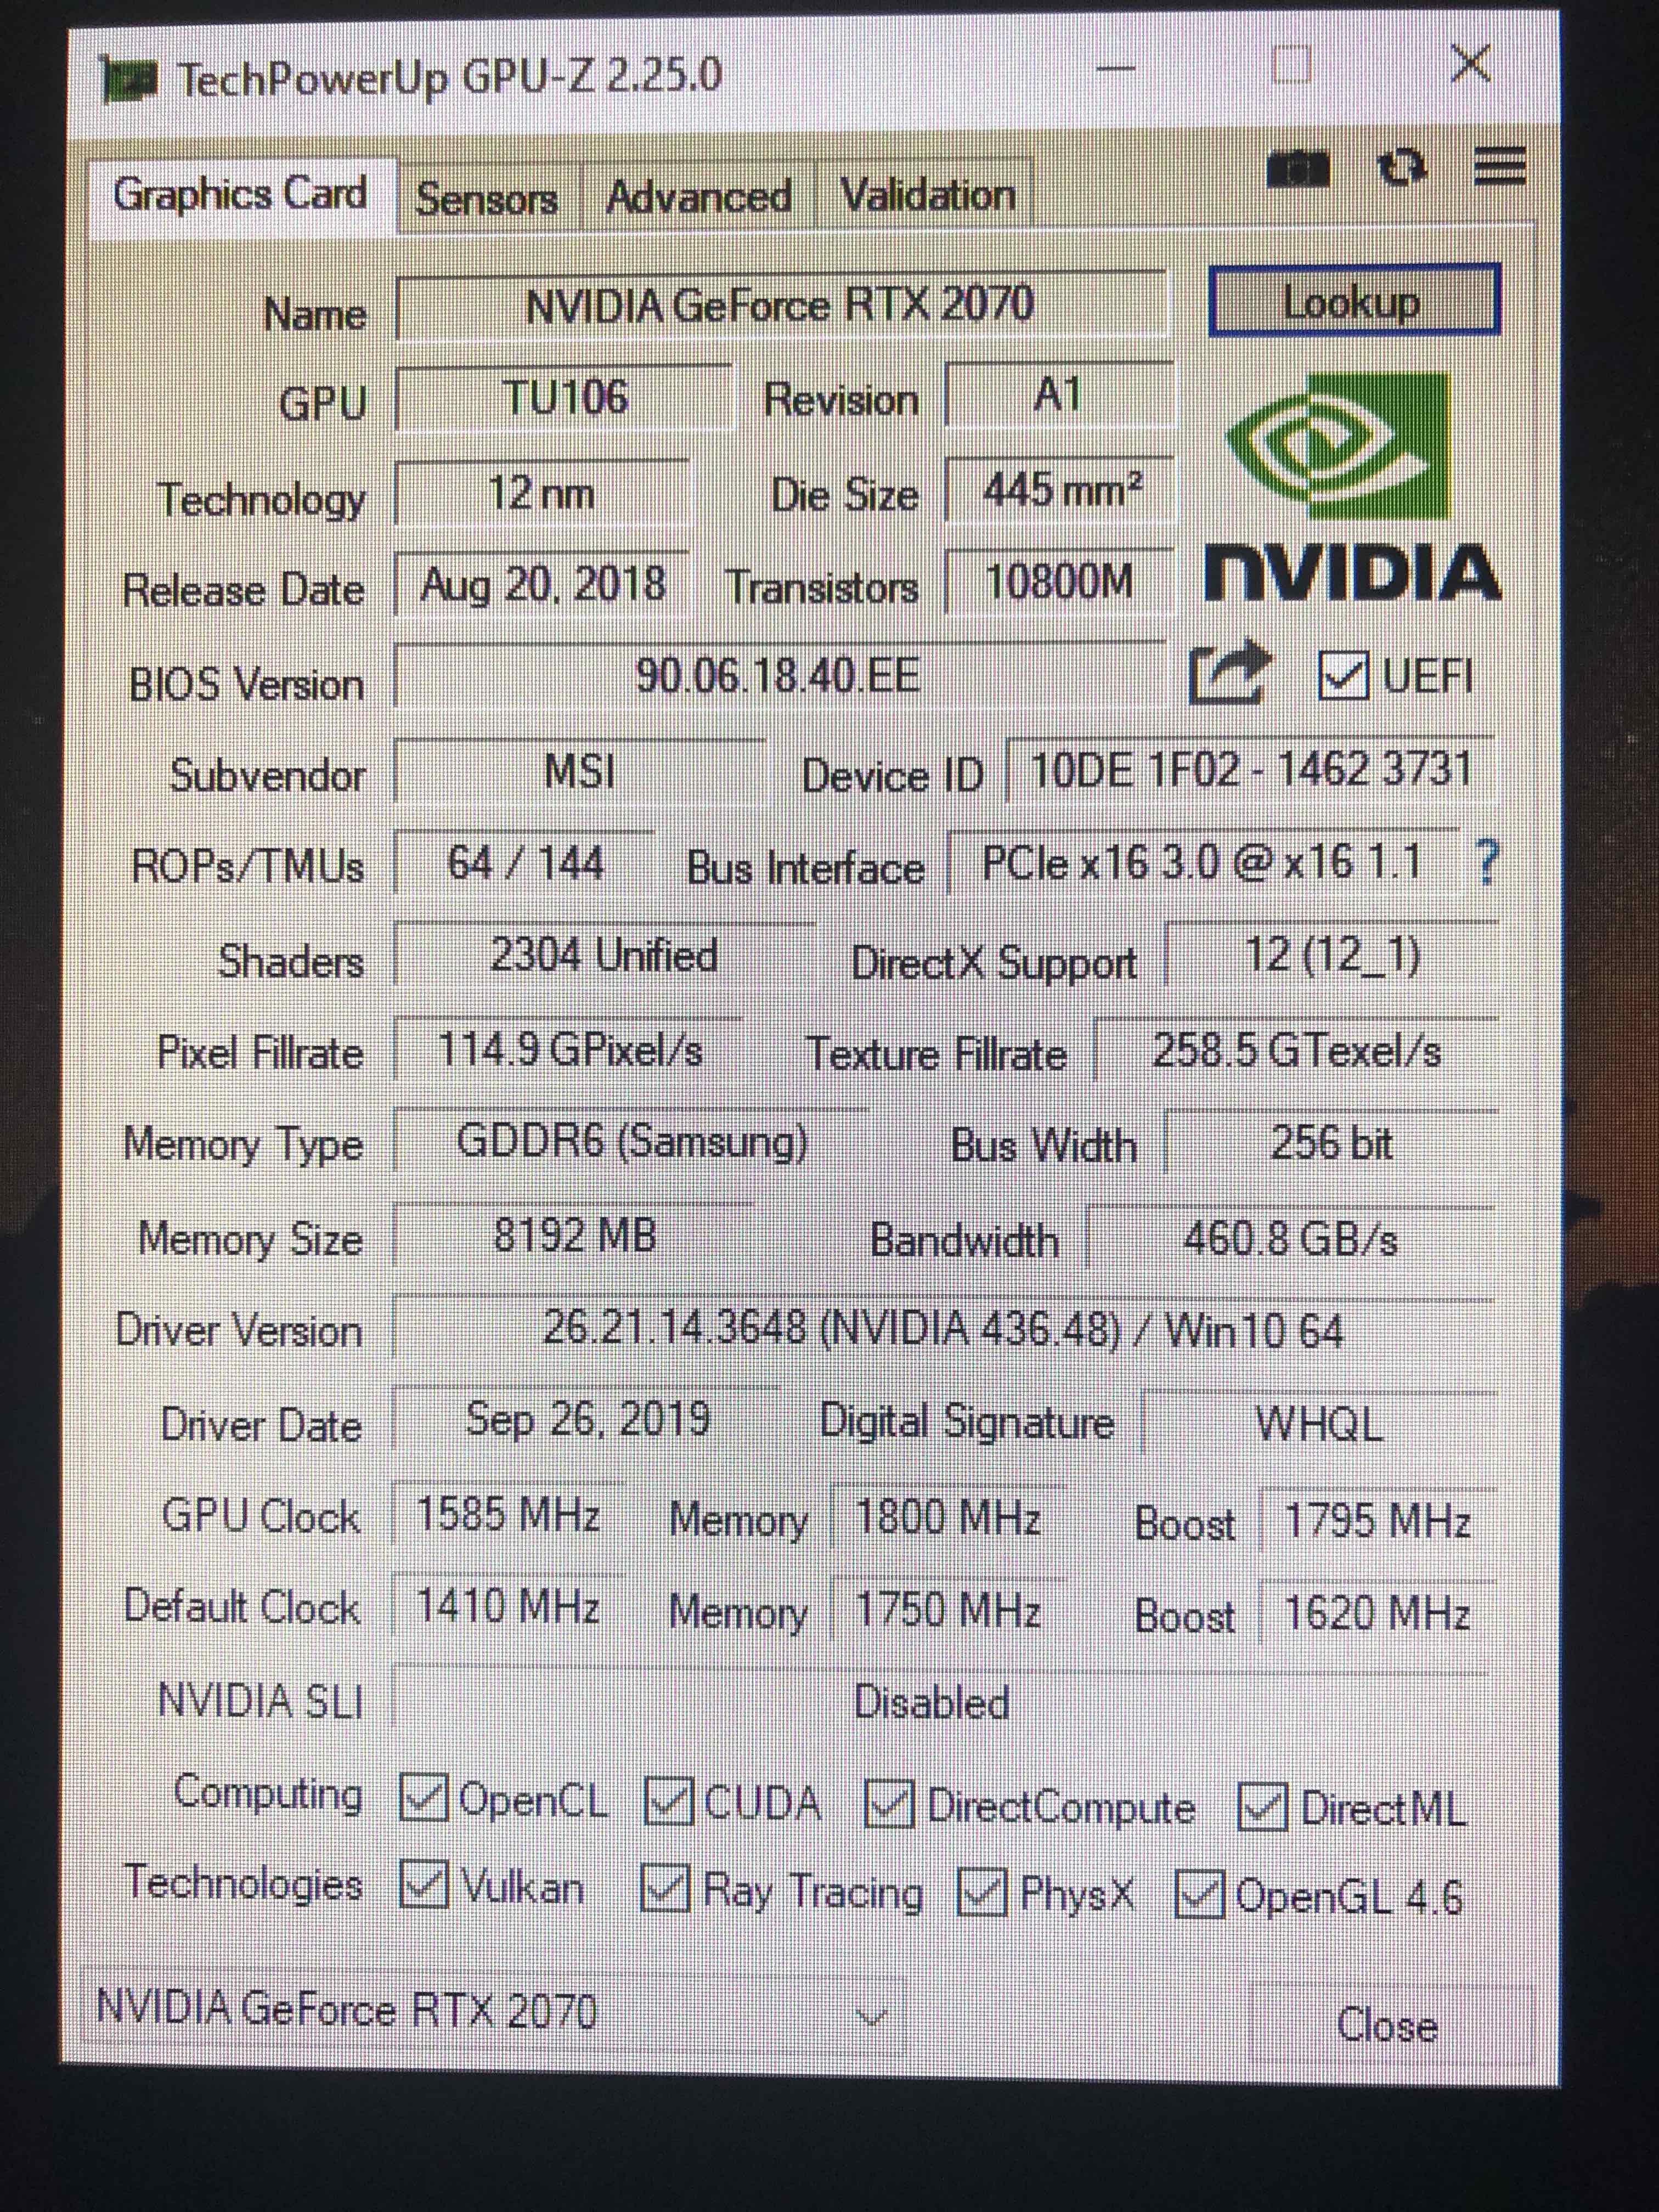
I changed a few things with MSI Afterburner. I bumped the RTX 2070's core clock from 1410 MHz to 1585 MHz, which moved the boost clock from 1620 MHz to 1795 MHz, and I altered the memory speed from 1750 MHz to 1800 MHz.

Here is a video that shows how to do that:
https://www.youtube.com/watch?v=vUEMS-B1Siw
GPU-Z shows us all of the numbers for the video card. Compare the Default Clock settings to the current GPU Clock settings:
Once that was done, I confirmed in Cinebench that we were now getting better OpenGL scores and I saw higher framerates when playing Fortnite.

Now we come to the most important discussion. Heat. Once all of the overclocking was done, it should be noted that both the computer processor and the video card were consistently running operating temperatures around 78C, and sometimes peaking into the low 80C range when gaming. If you would like your computer components to have a nice, long, lifespan, this is too hot. I began to investigate the airflow within the CyberPower PC case.
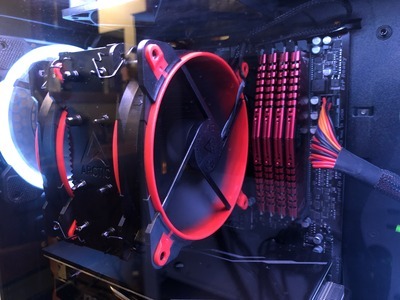
It turns out, all of the case fans in the Gamer Master case were configured to vent hot air OUT from inside of the case, but there were no fans configured to pull cool air INTO the case. What I did to resolve this issue was install an additional 120 mm case fan into the top of the case blowing cool air directly down onto the AMD Ryzen's heatsink/fan assembly, and I reversed the rear top case fan so that it would blow cool air onto the CPU from the rear of the case as well. I also installed an 80 mm case fan at the bottom-rear of the case blowing cool air directly beneath the RTX 2070's cooling fans. This resulted in maybe a 1 or 2 degree change in temps, but nothing substantial.
I now had three fans blowing cool air into the case and two fans venting out of the case, but there continued to be a tremendous amount of heat building up within the computer's enclosure. I looked at the venting on the side panel behind the case's exhaust fans and was surprised to find only thin vents cut out as small slots in the sheet metal. I put my hand up to these slots and was shocked to feel very little air movement whatsoever.
I decided to experiment by removing the side panel of the computer case, completely unobstructing the air flow of the exhaust fans. The temperature of the video card and processor suddenly dropped by over 10C! It appears that while I was successfully bringing cool air into the case, the vents in the side panel, obviously not designed for overclocking, were inhibiting the removal of the warm air. Once the air flow was maximized by removing the side panel and allowing the exhaust fans to freely vent the hot air out, gaming now occurs with both the processor and the video card displaying temperatures in the low to mid 60C range, and very rarely, occasionally reaching 70C. What an incredible result from such a simple solution!
All that it took to accomplish this dramatic reduction in temperature was a redesign of the airflow system within the computer case. Once that was accomplished, the computer performed nothing short of amazing. After the temperature issue was resolved, the PC was used extensively and at length for gaming, simultaneously recording the gameplay in OBS software, and I watched Youtube, Twitch, and Mixer on the computer for hours on end without a single crash.
For those of you interested in power consumption, I inserted a Kill O Watt meter between the computer and a power outlet. During idle, the computer draws around 90 watts. Under load such as gaming or running benchmarks, the computer pulls between 290 watts and 325 watts, with a highest peak so far of 350 watts. These power requirements are actually fairly low, and well within the overhead of the 600 watt power supply installed in the CyberPowerPC.
During one weekend, the PC was used by various members of the family for approximately 21 hours. After the weekend had ended, the Kill O Watt showed a total consumption of 7 kWh. The cost to run this computer during this time would be around 37 cents at .0533/kWh which is what we are currently paying to Toledo Edison.
This entire project has been such an exciting learning experience for me, I can't begin to describe how it has "recharged my batteries" and renewed my love of technology. I am looking forward to seeing eSports continue to grow and eventually be available to all students interested in this new opportunity for college scholarships and careers. Those of you currently "training" for eSports might want to consider investigating overclocking as an inexpensive way to become a little bit more competitive. There are, however, potential negative consequences involved and you could end up with a damaged or non-functioning computer. Experiment at your own risk!
Finally, the only costs involved here were $20.00 to purchase additional case fans, and an additional $60.00 for 16 GB of DDR4 3000 MHz memory.
CH
UPDATE: After further experimentation, the computer plays games with rock-solid results when the RTX 2070's core clock is boosted from 1410 to 1610, and the CPU is overclocked from a 3.7 GHz core to 4.2 GHz. The issues arise when I try to utilize the overclocked processor for anything that is highly multithreaded such as previously mentioned in this blog post. Heat appears to be the main issue. Once the processor goes above 85C, the computer crashes, likely due to the Ryzen thermal protection kicking in. At some point, I would like to try out some more effective CPU heatsink/fans and see if that allows higher overclocking with more stability, and less heat being developed by the CPU.
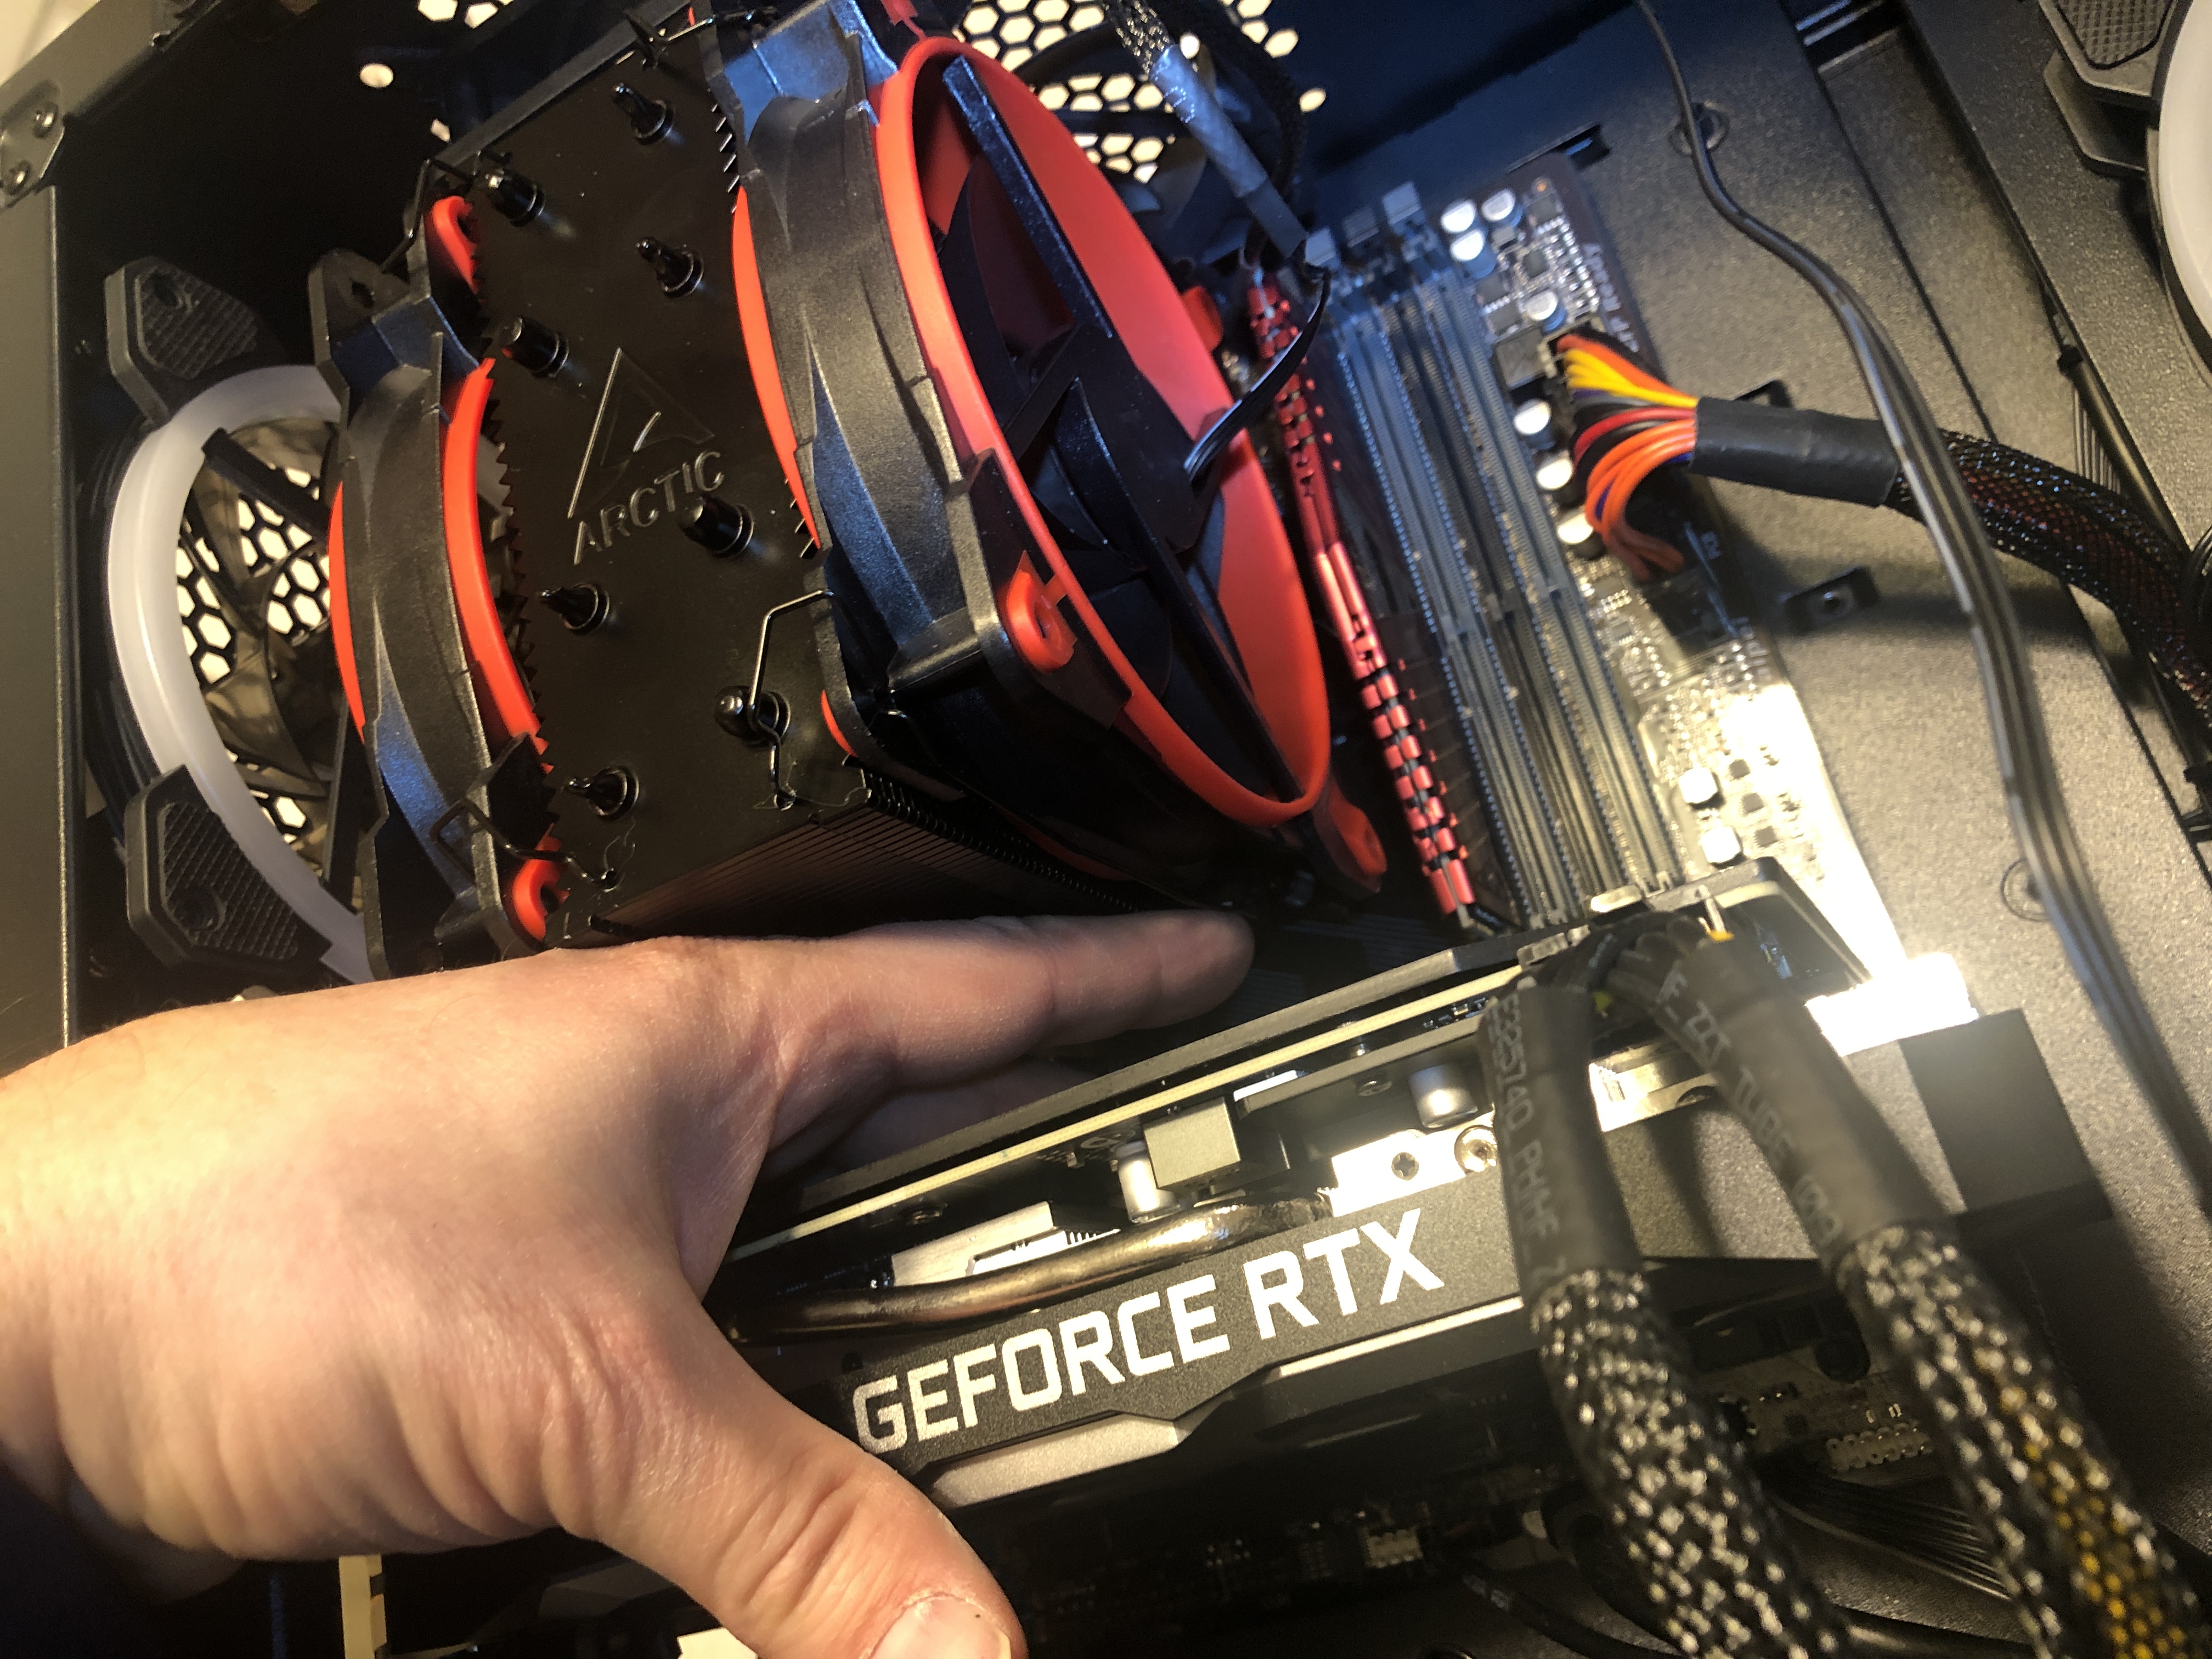
UPDATE 2: I just finished up installing an Arctic Freezer 34 eSports Duo as my new heatsink/fan combo into my CyberPowerPC.
I don't want to get too dramatic here, but the changes in temperature and performance are pretty incredible. For the first time, running the Ryzen 7 2700X CPU at 4.2 GHz successfully returns a Cinebench R15 CPU score now above 1900 at 1903. Prior to installing the Arctic Freezer 34 Duo, Cinebench would not run at 4.2 GHz or higher without crashing.
After the Arctic cooler was installed, I was actually able to play games and surf the web at a maximum speed of 4.25 GHz. An inconsequential 50 mhz boost does not seem worth it to run the risk of damaging my hardware, so I backed down the speed to 4.2 GHz and that is where it will stay.
The reduction in processor temperatures as a result of the Arctic cooler is extremely significant. Idle temps are now in the 27C to 30C range, and playing Fortnite results in temperatures in the mid-40C to low 50C range! I can run the Ryzen 7 2700X at 4.2 GHz without any issues in all applications with one exception. Nothing I do seems to be able to get Handbrake to run without crashing. I've boosted the core voltage on the processor using Ryzen Master as high as 1.45v. It still crashes. Going with any higher voltage would be unwise, IMHO. If my motherboard had better overclocking controls in the BIOS, I would probably try using the BIOS for overclocking rather than the Ryzen Master software.
I also replaced the original 16 GB of 2666 MHz memory with an additional 16 GB of 3000 MHz memory and overclocked all 32 GB of RAM to 3200 mhz using an XMP profile. Additionally, I finally ran the MSI Afterburner auto-overclock scan. The results gave me the courage to really bump the core clock and memory clock on the RTX 2070 graphics card.
The final overclocks have been running for months without incident. They are:
CPU via Ryzen Master
CPU- Core voltage set to 1.425v
CPU- overclocked to 4.2 GHz all cores
MSI RTX 2070 via MSI Afterburner
Core voltage increased- +100%
Power Limit- 105
Temperature Limit- 88C
RTX 2070 Core clock- 1630 MHz (or +220)
RTX 2070 Memory clock- 1975 MHz (or +900)
RTX 2070 Boost clock- 1840 MHz (determined by core clock setting)
The benchmarks under these overclocks are:
Cinebench R15
OpenGL- 129.46
CPU- 1903
3DMark Time Spy- 9544
Unigine Heaven- 6030
If you have a Ryzen 7 2700X and you plan on experimenting with overclocking, I HIGHLY recommend that you upgrade your fan/heatsink to an Arctic Freezer 34 eSports Duo provided that it is compatible with your motherboard. A note of caution: depending upon the motherboard that you have, this may, or may not be, a somewhat challenging computer upgrade. With respect to my Gigabyte micro-ATX board in my micro-ATX case, this was one of the most difficult upgrades I have ever attempted due to the lack of available space to work in.
Here's a tip that might help should you try to install this upgrade. You'll need to remove the fans from the heatsink prior to installing it on the motherboard. When reinstalling the fans, snap the wire mounting clips on the bottom of the fans first, and then snap the clips at the top. Starting at the top first consistently resulted in the fan mounting clips slipping out of the bottom of the heatsink, which created a bit of a nightmare to re-attach them as I could not see under the heatsink to locate the hole that the clip should be inserted into.
It was well worth the effort, however, as I have been able to significantly reduce the operating temperatures of my overclocked gaming/multimedia PC.
Additional costs:
Arctic Freezer 34 eSports Duo- $40
16 GB of 3000 MHz DDR4 memory- $60.00
Total cost of all upgrades to date: $180.00 (32 gigs RAM, case fans, Arctic Freezer)
UPDATE 3: It appears that many of these Ryzen processors are conducive to overclocking. I had the opportunity to overclock a Ryzen 7 2700 (not a 2700X) yesterday and was able to boost it from a 3.2 GHz base clock to 4 GHz merely by setting the change in Ryzen Master and increasing the voltage to 1.35v. Even with the stock cooler it ran at acceptable temps and was rock solid during many hours of gaming. What's interesting to note is that the percentage increase of the 2700 from a 3.2 GHz base clock to 4 GHz is a greater increase than my 2700X going from 3.7 GHz to 4.2 GHz. The 2700 is also less money than the 2700X, but only by about $20.
DIY Solar Pool Heater- My Summer Maker Project
I've been tossing this idea around for about 20 years, ever since we moved into our current house, a house that included an above-ground pool. I'm not really that fond of swimming pools, unless of course the water is exceptionally warm. The first time I put my foot into that pool and felt how cold the water was, I started thinking about ways that I could warm it up.
Very soon after getting it set up for swimming, when adding water to that above-ground pool, I noticed how hot the water was that had been sitting inside the garden hose which was laying out in the sun. I mulled over an idea of how I could use the sun and water to heat up a swimming pool. The initial issue with this solution was a lack of recirculation. If I continued to add hot water from the garden hose, eventually the pool would be overfilled. At that point I would have to remove some water from the pool (wasteful) in order to continue adding hot water.
Fast forward twenty years. I woke up Saturday morning and had to remove a submersible pump from an old stone well. As I was pulling the pump up, I suddenly realized that if I put a submersible pump in the pool, ran a couple of hundred feet of garden hose out into the yard and ultimately back into the pool, and was able to automatically turn the pump on and off once the water in the hose had been heated up by the sun, I would finally have my solar heated pool solution. But how could I automate the pump turning on?
This turned out to be the easiest and most cost effective part of my entire plan. You can now buy programmable power outlets/timers. These outlets allow you to program power on and power off events. Here is a timer similar to the one that I picked up from Menards:
Here's a link to a pump like the one I used:
The entire schematic looks something like this:
Programmable Timer->Pump in Pool->Hose to Yard->Hose to Pool
I set the timer to turn on at the hour and half hour, all day from 10 AM to 7 PM. The timer allows the pump to run for 3 minutes and then automatically turns off. This provides enough time for the hot water to evacuate from the hose, while refilling the hose with cool water off the bottom of the pool. 27 minutes later, the pump turns back on and again pumps hot water heated to 110F by the sun back into the pool.
Last evening we soaked and lounged in our pool with a water temperature in the mid-high 80s. Water temperature courtesy of the sun. :)
CH
WARNING: Remove timer from power and pump from pool before swimming! Electrical hazard.
Apple Watch Messages Reply Glitch/Bug/Mirroring Issue
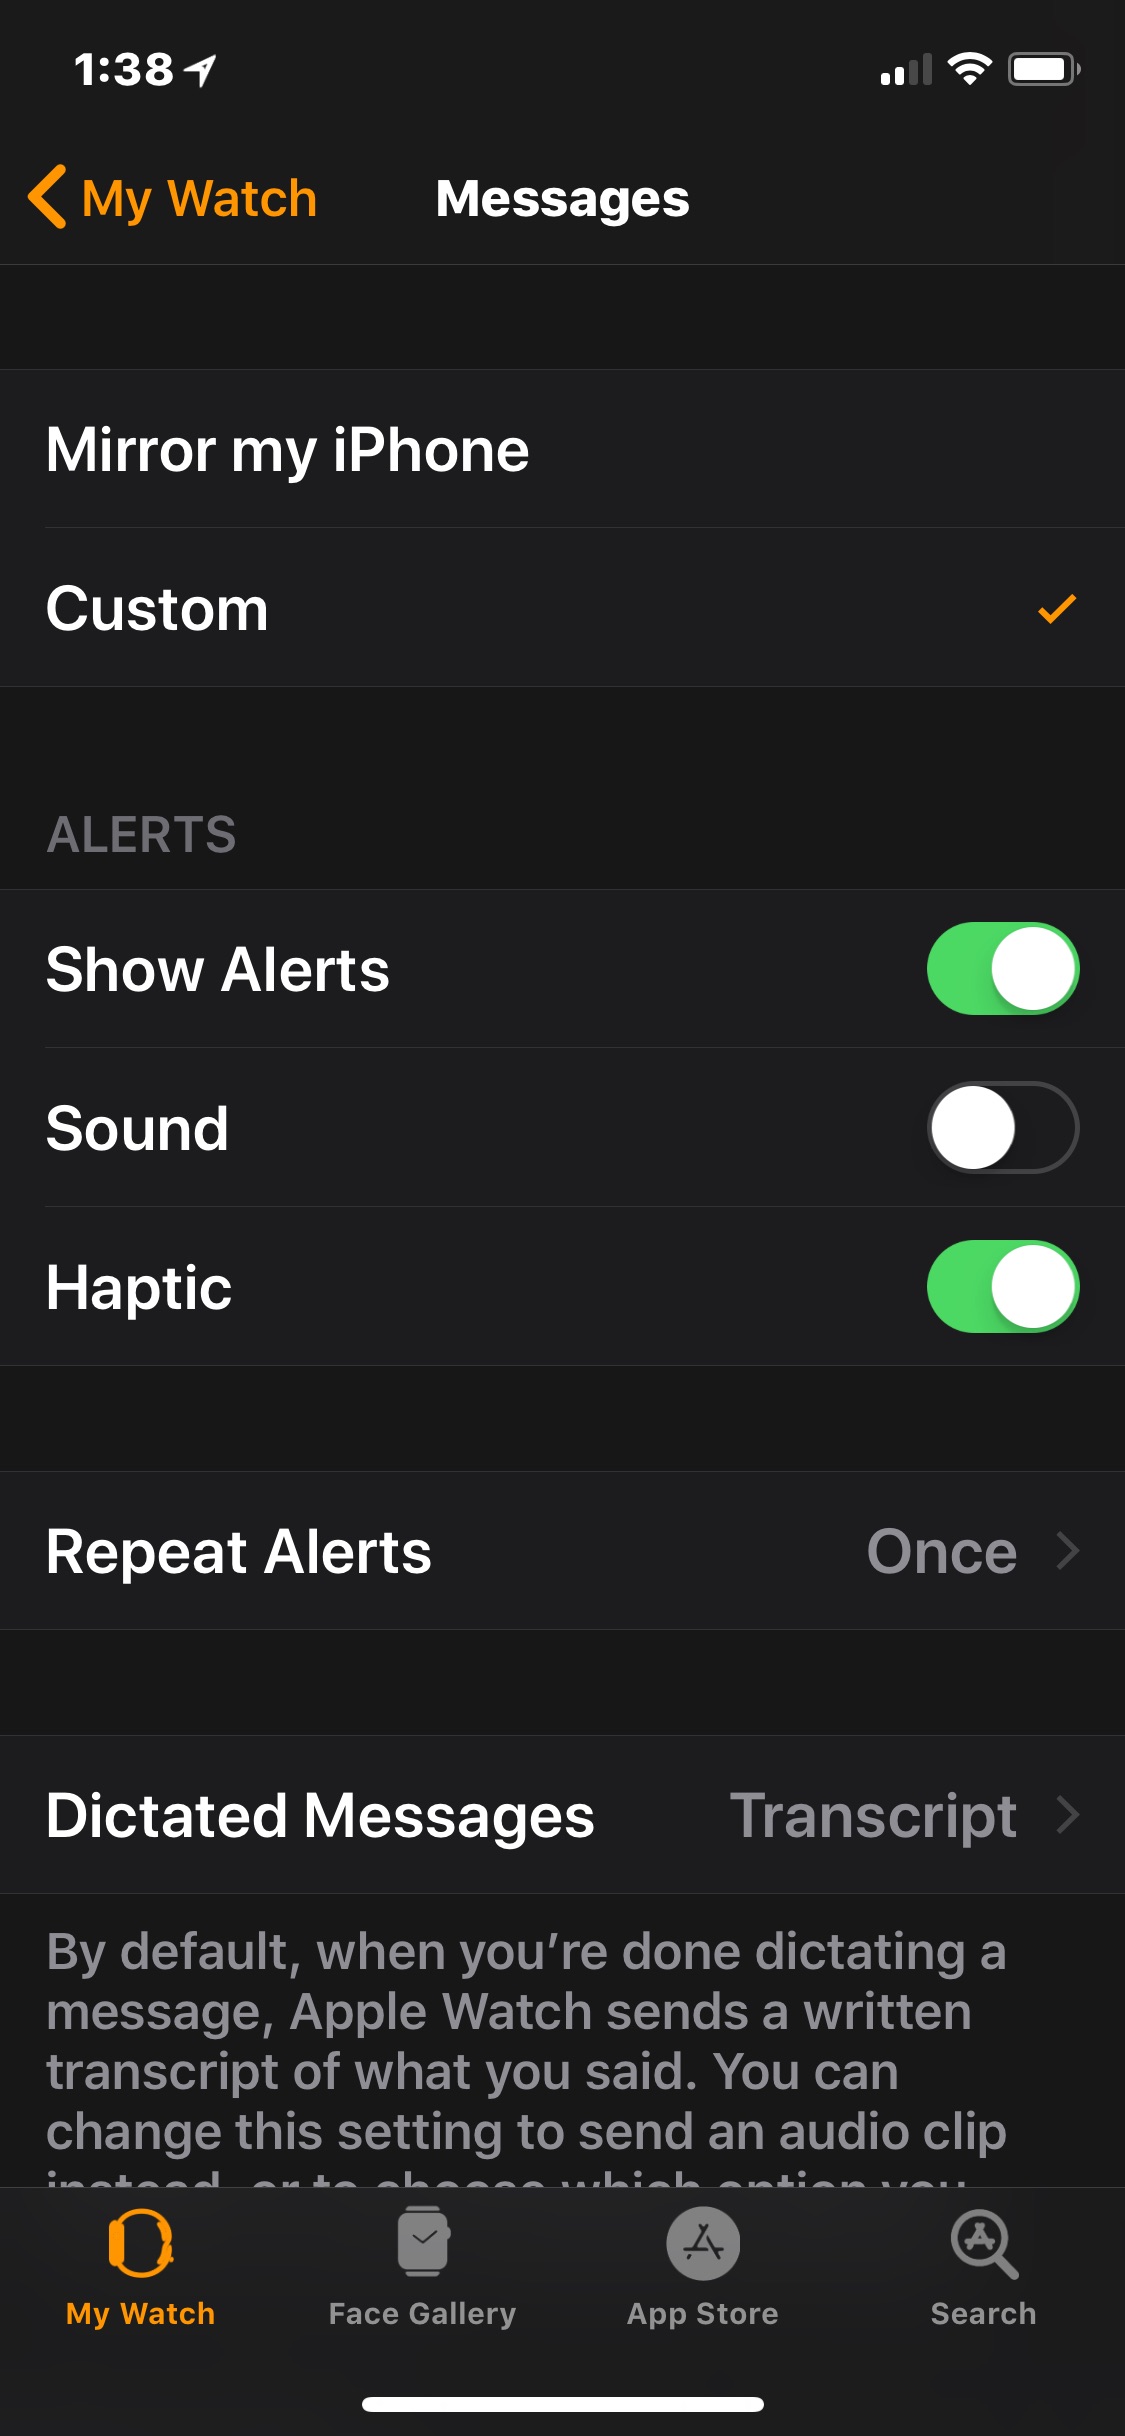
I've had an Apple Watch now for nearly two years. Overall, I absolutely love it. One little glitch with Messages on the watch has been bugging me though, and I believe that I have finally figured out the issue (after a suggestion from my wife that I actually look at the Messages' settings, which incidentally, are on the Apple Watch app located on the iPhone).
Let me first start by saying that I'm not sure if this was a bug, a glitch, or a configuration error on my part. All I know is that frequently I would receive a message on my watch, and then immediately hit the "voice to text" button to create a reply. The reply would immediately default to being sent via my Twitter SMS feed rather than the active incoming Messages thread. Normally, I would catch it prior to sending crazy messages to Twitter. Today, I did not. NOTE: If you don't have Twitter sending updates to your phone via SMS, you probably haven't noticed this issue.
Here is what I think is going on. By default, Apple Watch Messages are set to mirror Messages on your iPhone. Whatever messages are at the top of Messages on your iPhone move to the top of Messages on the Apple Watch. After a number of Twitter updates posting to Messages on my iPhone and Apple Watch via the Messages app, if I would receive a text message from someone, the following would occur:
If I didn't manually make sure that I was posting a reply on the correct thread and instead just hit the voice to text button, I think the Twitter thread at the top of the iPhone Messages app was causing the Apple Watch to (mirror) switch to that thread in the middle of my dictation. If I clicked send at that point, the message would go to Twitter instead of the Messages thread I was trying to respond to. I realize that Messages on the iPhone should have switched to the incoming chat thread and stop this behavior, but I think this could potentially be a bug.
Turning off Mirroring, switching to Custom, in the Messages section of the Apple Watch app on my iPhone seems to have corrected this issue. If there is another explanation that I am missing, please add it to the comments and I will update this blog.
CH